
Introduction
Node js is a popular backend nowadays! It’s fast and easy to write code. If you already know javascript, it can be easy to write node js. So we’re going to explore express js today with MongoDB for the database. We’ll create the rest API endpoints and implement CRUD operation for the to-do list. The example is quite basic, but we’re going to make a good project structure so that you can follow it for your other projects too! Let’s dive in –
Things I’m using
Vscode: I’ve used the vscode for the whole development!
Node js: I’ve used node js v14.8.0
MongoDB compass: I’ve used MongoDB v1.30.1 to see all changes in MongoDB graphically
Postman: We’ll use this one to test all our API’s
Packages:
- babel: For transpile the javascript into an older version
- cors: For the CORS setting
- dotenv: For reading the environment variables
- eslint: For enforcing a coding style
- express js: The node framework
- express-rate-limit: For limiting the API endpoint calls
- husky: For git pre-commit to hook for implementing eslint & prettier before committing
- joi: Used to validate the user inputs
- mongoose: MongoDB ORM for working with MongoDB
- morgan: For showing API endpoint details
- nodemon: For running the server, when we change a file
- prettier: For formatting the code
Project Setup
Basic Project Setup
We’ll start with npm init -y on the folder to initialize the node and create the package.json file. You can edit the package.json file as you want! Now create an src folder to write all our code in the folder. We’ll also make an index.js file as a starter.
Setup the Express JS with babel
If we usually set up the nodejs with `npm init -y`, then we can’t use the latest features of javascript! To solve this problem, we are going to use babel. Babel is a compiler for javascript; it complies with the new versions of javascript to older javascript. If we active babel, we can use async-await, which will transfer into earlier javascript!
To set up the babel, we need to install –
npm i @babel/cli @babel/core @babel/node @babel/preset-env -Dand also, we need to add a file called .babelrc
{
 "presets": [
 "@babel/preset-env"
 ]
}
We need to adjust the package.json file to work correctly.
"start": "node dist/index.js",
"dev": "nodemon --exec babel-node src/index.js",
"build": "babel src -d dist"
This will complete the babel set up, and you can run it by using npm run dev if you want a production version, then use npm run build first and then try npm start that will start the application!
Improving coding styles & formatting
This part is only needed if you are interested in maintaining good structure and rules throughout the codebase. This will require the eslint and prettier. Eslint will enforce a coding style, so every developer follows specific rules. Prettier will follow the code format automatically! Eslint comes with vscode! So you don’t need to install eslint on your vscode. But you need to install the prettier on your codebase because it is necessary for code styles. So how to install them? Let’s do it together by installing –
npm install eslint eslint-config-prettier prettier -D Let’s set up the prettier first, which is pretty straightforward. We’ve to create a file called .prettierrc, and we need to put
{
 "trailingComma": "es5",
 "tabWidth": 2,
 "semi": false,
 "singleQuote": true
}
This is all needed for the prettier now; let’s set up the Eslint. For Eslint, setup starts with
./node_modules/.bin/eslint --initIt will pop up some questions. Now select the one based on your interest. For this project, we choose
- To check syntax, find problems, and enforce code style
- CommonJS (require/exports)
- None of these
- No
- Node
- Use a popular style guide
- JSON
- Yes
Now it’ll install some new packages and create .eslintrc.json file! Now we have to edit a little bit here –
"extends": ["airbnb-base","prettier"]We’ll add the prettier here, and we are pretty done. If your vscode has all the extensions already, if you write any wrong code, then you’ll see the errors.
If someone doesn’t want to use the vscode extensions, they can check the error by running npm run lint. But it’ll fail because we didn’t add any script like this. So go to the package.json file and add –
"lint": "eslint --fix"Improving git experience with husky
Our codebase has some rules and formatting ways. But still, it’s not going to happen if someone doesn’t have those extensions or doesn’t care about the errors. Also, many devs work from different IDE; you can’t force them to use the same one. So we will play with the git hook a little bit to solve the problem. So whenever anyone tries to commit, we will check the eslint, and then we will format the file with prettier. So how to do it?
We can do it using husky & lint-staged, and we will work on that right now. Let’s install husky and lint-staged
npm i husky lint-staged -DWe need to improve the package.json file. Add some extra lines on the last part.
 "lint-staged": {
 	"**/*.{js,jsx}": [
 		"npm run lint",
 		"prettier --write"
 	]
 }
Now we need to enable the git hook.
npx husky installlet’s add a git hook which is going to help us to do the lint-staged before committing the changes
npx husky add .husky/pre-commit "npm test"Now you’ll see a .husky folder on the root level with a file inside `pre-commit`, and let’s modify it a little bit.
#!/bin/sh
. "$(dirname "$0")/_/husky.sh"
# npm test
npx lint-staged
Now it’ll work like magic. Try to commit your changes and see it’s doing something before committing, and this way, you can easily enforce something before committing!
Improving security
Now our server is quite ready. Let’s jump into the `index.js` file to start our work. But before that, let’s improve the security a little bit. We will use environment variables because we’re not going to expose it directly out on our repo! For this, we will use the `dotenv` npm package. It’s super easy.
import'dotenv/config'The upper line will give us the power to access any value from the .env file (from root)! Check .env-example to get an idea of what I’ve inside the .env file. It’s your credential/secret data, so never upload it to the public git repo! To access any variable, use –
process.env.VARIBALE_NAMENow let’s do some basic stuff.
import Express from 'express'

const app = Express()

const port = process.env.PORT || 3000
app.listen(port, () => console.log(`listening on port ${port}`))
Now let’s add some middlewares here. The first one will be cors because it enables you to do the CORS settings! Also, add `helmet` middleware. It helps you secure your Express apps by setting various HTTP headers! The code will look like
import Cors from 'cors'
import Helmet from 'helmet'

app.use(Cors())
app.use(Helmet())
As we are building the API, there can be some DDoS attack or potential hacker attack, or maybe something is broken, and it keeps calling the API like thousand times in a min. We don’t want that. So let’s add a limit –
import RateLimit from 'express-rate-limit'

const limiter = RateLimit({
  windowMs: 15 * 60 * 1000,
  max: 100,
  standardHeaders: true,
  legacyHeaders: false,
})

app.use(limiter)
Are we done? Sadly no. We are going to make a slight improvement on the server! We’ll check details on every API call in our console.log, so we’re going to add a logging package called morgan
import Morgan from 'morgan'

app.use(Morgan('tiny'))
The upper two lines will help us see the API endpoints details on our console.
Finally, for the JSON inputs from user, add the last middleware.
app.use(Express.json())It parses incoming requests with JSON payloads and is based on body-parser!
Connect to MongoDB
Connecting to MongoDB is pretty straightforward. First, we are going to install the mongoose package. Because it’s better than just using MongoDB, it’s an ORM and comes with lots of benefits already. So how to connect a DB with it?
importMongoosefrom'mongoose'

Mongoose.connect('mongodb://localhost/demotodo')
 .then(() => console.log('Connected to MongoDB...'))
.catch((err)=>console.log(`Could not connect to MongoDB...${err}`))
See, this is so easy, right? ‘
Now, let’s start writing the API endpoints.
Let’s create a post API endpoint first so that we can add some values inside the database demotodo
REST API endpoints
We’re going to create five endpoints. Let’s look at the URLs first –
/app/v1 -> Post -> add a data to database
/api/v1 -> Get -> get all the data from database
/app/v1/id -> Get -> get a single item data by id from database
/app/v1 -> Delete -> delete a data from database
/app/v1 -> Put -> update a data from database
We’ll start with the POST method. But before that, let’s make our code a little better. We’ll create a folder called routes and model. In the model folder, we’ll put the MongoDB database model. In the routes folder, we’ll post different routes. You can also create a controller folder to write the controller, called from routes. But for simplicity, I’ll go with one single file in routes & model. Let’s create a todo.js file in the model & route both folders.
Now lets a go-to model first to create the model. We’ll call the mongoose package and make the data structure here. We’re going simple. We’ll create a title(text) & completed (bool) for the schema, and when we add data from here, it’ll always add a unique id by mongo. Let’s do this –
import Mongoose from 'mongoose'

const todoSchema = new Mongoose.Schema({
  title: {
    type: String,
    required: true,
    trim: true,
    minlength: 5,
    maxlength: 255,
  },
  completed: {
    type: Boolean,
    default: false,
  },
})

export default TodoModel
Upper lines will create the model. But we also need to do validation when someone sends us data. We’ll put the validation function here because it’ll be closer and easier to maintain. Let’s add the joi package to write the validation function –
import Joi from 'joi'

const TodoModel = Mongoose.model('Todo', todoSchema)

const JoiSchema = Joi.object({
  title: Joi.string().min(5).max(255).required(),
  completed: Joi.boolean(),
})

export const validateTodo = (todo) => JoiSchema.validate(todo)
We’ll use this both export from our routes file. Let’s do the POST method right now!
POST
As a starter of `routes/todo.js` we’ll call the libraries and model with validations –
import express from 'express'
import Mongoose from 'mongoose'
import Todo, { validateTodo } from '../model/todo'
Now write the router –
const router = express.Router()It’s time to write the post route to add data from the postman! We’ll follow some steps to write this part of the code –
- is there an error with the validate function from the `model/todo.js` file? If error then send a response with an error
- If there is no error, then create data using the mongoose model
- Save it & send a reply to the user
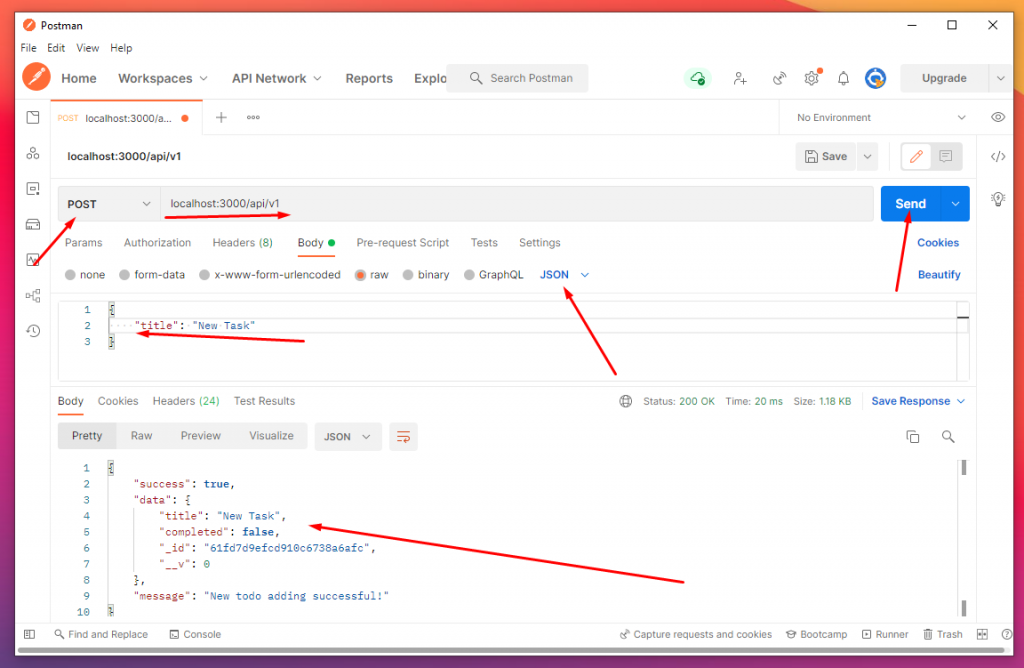
// insert a new data in todo
router.post('/', async (req, res) => {
  // validate using Joi, with factoring function
  const { error } = validateTodo(req.body)

  // if have any error then return bad request with error else just add the new one
  if (error) {
    return res.status(400).json({
      success: false,
      data: [],
      message: error?.details[0]?.message,
    })
  }

  let todo = new Todo({
    title: req?.body?.title,
    completed: false,
  })

  todo = await todo.save()

  return res.json({
    success: true,
    data: todo,
    message: 'New todo adding successful!',
  })
})
Now, let’s test it from the postman! Start the app with npm run dev and go to URL localhost:3000/api/v1/ –
GET
Let’s find out the steps we need to get all the data from mongodb
- Find out all the data using find()
- Send as response
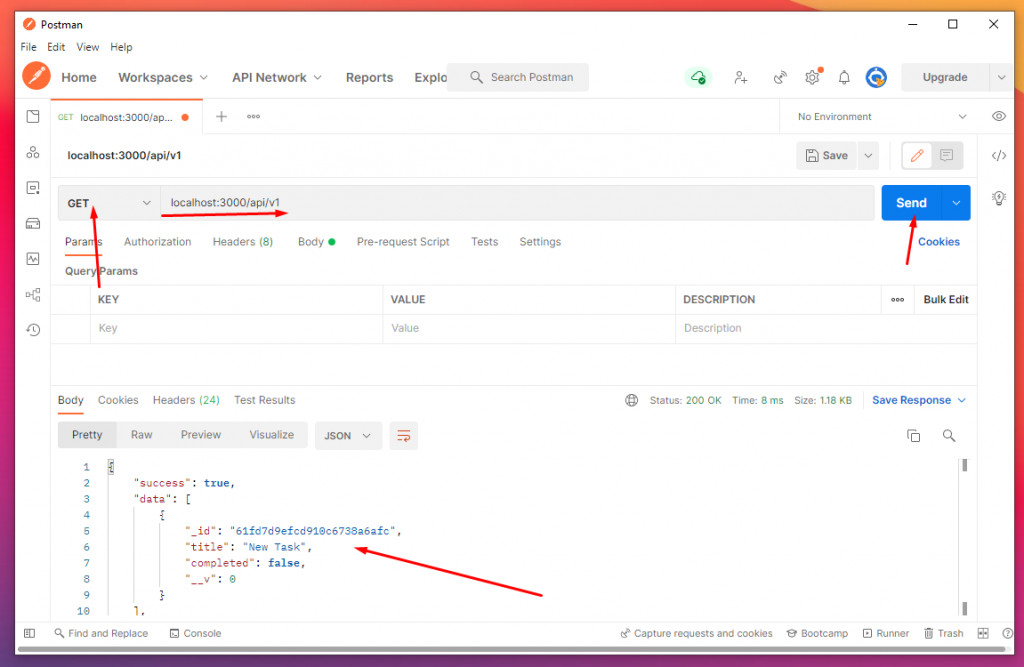
// Get request for getting all todo data
router.get('/', async (_req, res) => {
  // sending all data to response
  const todos = await Todo.find()

  return res.json({
    success: true,
    data: todos,
    message: 'Request successful!',
  })
})
It’s pretty easy! Right? Start the app with npm run dev and go to URL localhost:3000/api/v1/ –
GET A SINGLE
Let’s find out the steps we need to get a single data from mongodb
- Check if the given id is a mongodb valid id. If not, send a error response to user
- Otherwise, try to get the data using findById(givenID)
- Send response based on the data we got
// Get the data about a single todo
router.get('/:id', async (req, res) => {
  if (!Mongoose.Types.ObjectId.isValid(req.params.id))
    return res.status(404).json({
      success: false,
      data: [],
      message: 'It is not a valid mongodb id',
    })

  // search using id In mongodb with mongoose
  const todo = await Todo.findById(req.params.id)

  // checking if todo not found then 404 request
  if (!todo)
    return res.status(404).json(
      res.json({
        success: false,
        data: [],
        message: 'There is no data found related to this id!',
      })
    )

  // if found then send the response
  return res.json({
    success: true,
    data: todo,
    message: 'Finding successful!',
  })
})
It’s pretty easy! Right? Start the app with npm run dev and go to URL localhost:3000/api/v1/id –

PUT
Let’s find out the steps we need to update the data in MongoDB
- First, validate the data user is sending to API; if there is inaccurate data, just send an error response to the user!
- Otherwise, try to update data by finding id first. Use findByIdAnUpdate() method to do it with giving the new data
- If there is data, then it’ll be blank, and the response will error; otherwise, send the success response!
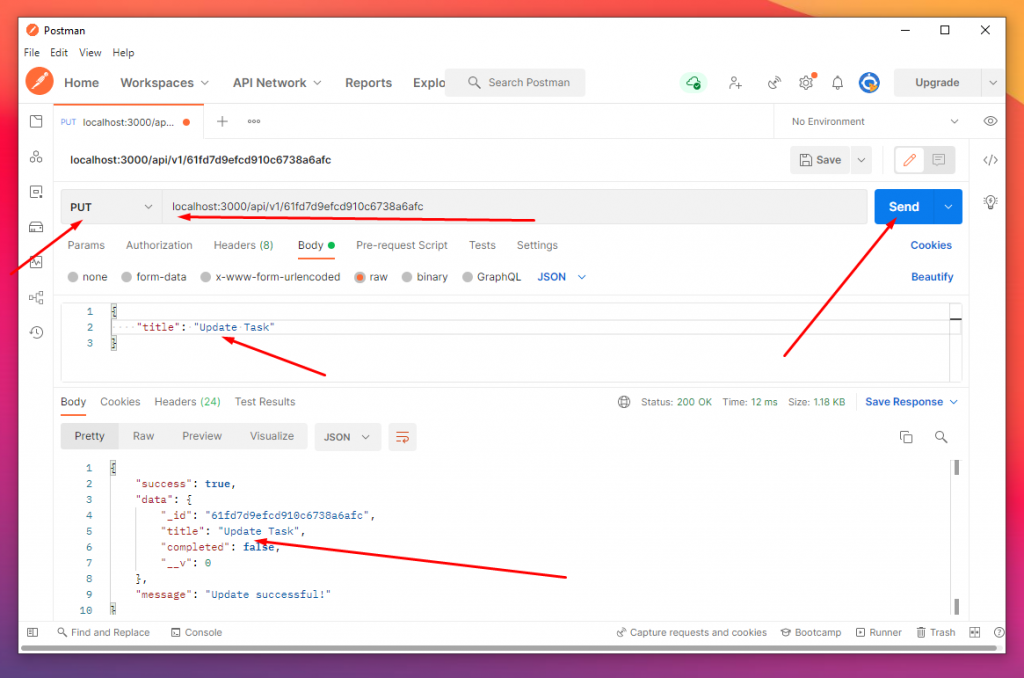
// update an existing todo
router.put('/:id', async (req, res) => {
  // Validating the user input
  const { error } = validateTodo(req.body)

  if (error) {
    return res.status(400).json({
      success: false,
      data: [],
      message: error?.details[0]?.message,
    })
  }

  // find Id and updated it by mongoose
  const todo = await Todo.findByIdAndUpdate(
    req.params.id,
    { title: req?.body?.title, completed: req?.body?.completed },
    {
      new: true,
    }
  )

  // if todo is not available then error or else new updated data send to user
  if (!todo)
    return res.status(404).json({
      success: false,
      data: [],
      message: 'There is no data found related to this id!',
    })

  return res.json({
    success: true,
    data: todo,
    message: 'Update successful!',
  })
})
It’s pretty easy! Right? Start the app with npm run dev and go to URL localhost:3000/api/v1/id –

DELETE
Let’s find out the steps we need to delete data from MongoDB
- We’ll try to delete once we get the id by findByIdAndRemove()
- Send response based on the result
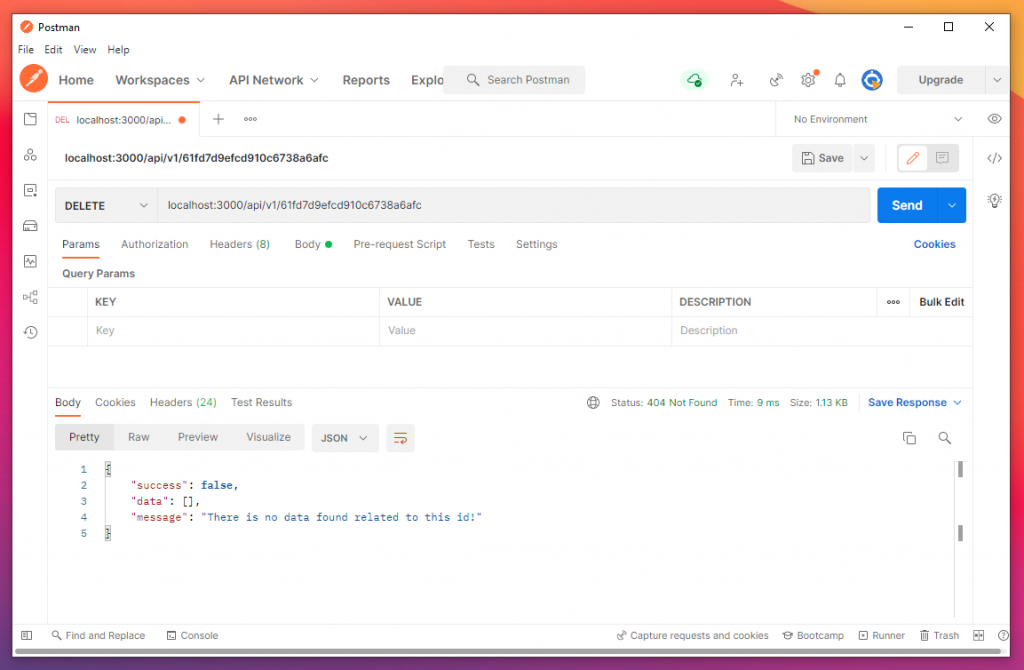
// delete a todo
router.delete('/:id', async (req, res) => {
  // find an delete the data using moongoose & mongodb
  const deletedTodo = await Todo.findByIdAndRemove(req?.params?.id)

  // checking if todo not found then 404 request & if found then send the response
  if (!deletedTodo)
    return res.status(404).json({
      success: false,
      data: [],
      message: 'There is no data found related to this id!',
    })

  // finally response send with deleted data
  return res.json({
    success: true,
    data: deletedTodo,
    message: 'Delete successful!',
  })
})
It’s pretty easy! Right? Start the app with npm run dev and go to URL localhost:3000/api/v1/id –
Let’s try to delete the same id again! Let’s see what happens –
Final words
I’ve tried to explain everything as I think. But there is a lot of improvement we can make. I didn’t add a try-catch block because this blog will be long after that. But you should add that. If you want to see the code. Please check out – https://github.com/nerdjfpb/expressjs-rest-api-with-mongodb
If you have a question. Please reach out to me in – instagram, twitter, linkedin
I’m building a developer community. If you want to join then –